

AI Translator
Instant translation powered by Google Neural
.jpg)
full system diagnostics, and OBD2 functions for reading P0325 and other DTC codes.
🟠 P0325 Code: Knock Sensor 1 Circuit Malfunction (Bank 1) | Complete Guide
P0325 stands for "Knock Sensor 1 Circuit Malfunction (Bank 1)". This code is triggered when the Engine Control Module (ECM) detects an abnormal signal or lack of signal from Knock Sensor 1 (KS1) on Bank 1 of the engine. The knock sensor is a piezoelectric device that detects vibrations caused by engine detonation (knock or ping) and sends this data to the ECM. The ECM then adjusts ignition timing to prevent engine damage. When P0325 occurs, Bank 1 loses knock protection, risking piston damage, head gasket failure, and reduced engine lifespan if left unresolved. P0325 is a generic OBD-II code that applies to all makes and models with internal combustion engines.
📑 Table of Contents
🔍 What Does P0325 Mean?
The P0325 diagnostic trouble code (DTC) indicates that the Engine Control Module (ECM) or Powertrain Control Module (PCM) has detected an abnormal or missing signal from Knock Sensor 1 (KS1) on Bank 1 of the engine.
Knock sensors are piezoelectric devices — small ceramic crystals that generate a voltage when subjected to mechanical stress or vibration. They are bolted directly to the engine block and listen for the specific high-frequency vibrations caused by engine knock (detonation or pre-ignition).
When detonation occurs — from low-octane fuel, overheating, carbon buildup, or incorrect ignition timing — the sensor sends a voltage spike to the ECM. The ECM then retards ignition timing to prevent engine damage. A normal knock sensor signal ranges from 0.5V to 5V depending on vibration intensity.
When P0325 is set, the ECM detects that KS1's signal is abnormal, erratic, or completely absent for 3 or more consecutive drive cycles. This leaves Bank 1 completely unprotected from knock, which can cause:
- Piston damage — holes melted in piston crowns from uncontrolled detonation
- Head gasket failure — excessive cylinder pressure blows the gasket
- Ring and bearing damage — sustained knock wears internal components
- Reduced engine lifespan — cumulative damage from undetected knock events
P0325 is specific to Bank 1 — the side of the engine that contains cylinder number one. On inline 4-cylinder engines, there is typically only one knock sensor, so P0325 is the only knock sensor code you'll see. On V6, V8, and some inline-6 engines, there are two knock sensors (one per bank), and P0325 affects Bank 1 while P0330/P0332 affects Bank 2.
📍 Diagram 1: Knock Sensor Location on Engine Block
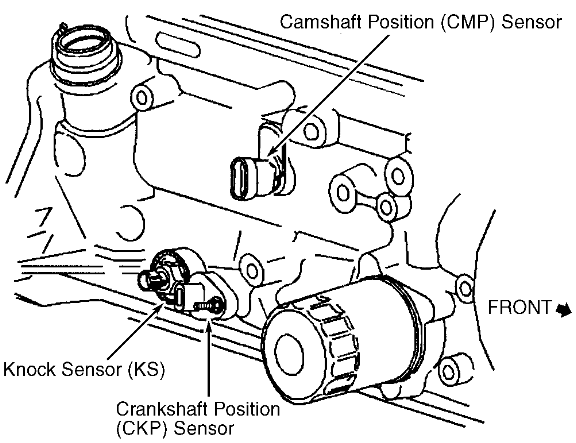
Figure 2: Typical knock sensor location on the engine block — mounted near the crankshaft position sensor, listening for detonation vibrations from Bank 1 cylinders.
🔬 Diagram 2: Knock Sensor Internal Structure
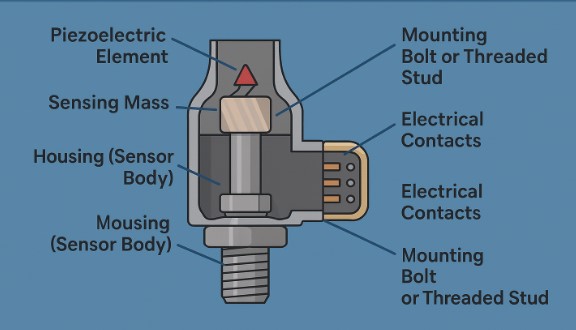
Figure 3: Cross-section of a knock sensor showing the piezoelectric crystal element, sensing mass, and electrical contacts that convert engine vibrations into voltage signals.
⚠️ Symptoms of P0325 Code
While some drivers only notice the Check Engine Light, P0325 often produces noticeable drivability issues:
| Symptom | Severity | Description |
|---|---|---|
| 🔴 Check Engine Light ON | High | Steady CEL. P0325 stored. May appear with related codes P0326, P0327, P0330, or P0332. |
| 🔊 Engine Knock / Pinging | High | Metallic "pinging" or "knocking" sound from Bank 1 during acceleration, especially under load (hills, towing). |
| 🐌 Reduced Power & Acceleration | High | ECM enters "limp mode" — retards timing conservatively, cutting power by 10-20% to protect the engine. |
| ⛽ Increased Fuel Consumption | Medium | Retarded timing reduces combustion efficiency. MPG drops 5-10% (2-5 MPG on average). |
| 🌡️ Overheating Risk | Medium-High | Uncontrolled knock increases cylinder temperatures, potentially causing overheating, spark plug damage, or piston scoring. |
| ❌ Failed Emissions Test | Medium | Misfires from knock raise hydrocarbon (HC) and carbon monoxide (CO) emissions. |
| 🚗 Rough Idle or Hesitation | Low-Medium | Conservative timing map causes uneven combustion at idle and hesitation under load. |
| 💨 Poor Throttle Response | Medium | Delayed acceleration response due to ECM running safe (conservative) ignition map. |
If you hear a loud metallic knocking sound under acceleration, stop driving immediately. This is active detonation on Bank 1 that the sensor cannot detect. Continuing to drive risks catastrophic piston damage within 30 minutes of high-load operation.
🔧 Common Causes of P0325 Code
P0325 is an electrical circuit code, but the root cause can be the sensor, wiring, connector, or even internal engine damage. Here are the causes ranked by likelihood:
1. Faulty Knock Sensor 1 (KS1) — ~45% of Cases
The most common cause. The piezoelectric element inside KS1 degrades over time due to:
- Heat cycling — repeated heating and cooling cracks the ceramic crystal
- Vibration fatigue — years of engine vibration wear out the sensing element
- Coolant contamination — coolant leaks dripping onto the sensor corrode internal components
- Age — most knock sensors last 100,000-150,000 miles before failing
2. Damaged KS1 Wiring or Harness — ~30% of Cases
Wiring issues are extremely common and often overlooked:
- Frayed or cut insulation — heat from the engine block melts wiring near the sensor
- Rodent damage — mice/squirrels chew wiring under the hood
- Corrosion — moisture intrusion at connectors causes green/white powdery deposits
- Pinched or rubbed wires — contact with sharp metal edges or hot components
3. Loose or Corroded Sensor Connector — ~15% of Cases
The electrical connector at KS1 can fail due to:
- Loose locking clip — vibration causes the connector to back out slightly
- Moisture intrusion — water enters the connector, causing corrosion
- Bent or pushed-in pins — improper handling during previous repairs
- Dirt and debris — oil and grime buildup prevents proper electrical contact
4. Incorrect Sensor Torque or Mounting — ~5% of Cases
The knock sensor MUST be torqued to exact manufacturer specifications:
- Under-torqued — sensor cannot vibrate properly with the block, weak signal
- Over-torqued — cracks the piezoelectric element, destroying the sensor
- Dirty mounting surface — paint, rust, or debris dampens vibration transfer
5. ECM/PCM Malfunction — ~3% of Cases
Rare but possible. A faulty ECM fails to detect or process KS1's signal. Usually accompanied by other communication codes like P0606 (ECM internal fault). Requires professional diagnosis and reprogramming.
6. Internal Engine Mechanical Damage — ~2% of Cases
Severe cases where the engine itself is damaged:
- Worn rod bearings — create excessive vibration that overwhelms the sensor
- Damaged pistons — slap or rattle mimics knock frequency
- Loose timing chain — chain slap creates false vibration signals
Before replacing the sensor, always test the wiring first. A $20 wiring repair is much cheaper than a $100 sensor replacement, especially on V6/V8 engines where the sensor is buried under the intake manifold (4-8 hours labor).
🚗 Vehicles Most Commonly Affected by P0325
P0325 appears on all vehicles with knock sensors. Here are the most commonly affected:
| Brand | Common Models | Known Issues |
|---|---|---|
| Toyota | Camry, Corolla, RAV4, Tacoma, 4Runner, Highlander | KS1 on 4-cylinder engines accessible from top. On V6, under intake manifold. Coolant leaks from valley gasket common. |
| Honda | Civic, Accord, CR-V, Odyssey, Pilot, Element | KS1 on front of engine block. 27mm spanner needed. Wiring harness often corrodes. OEM sensor recommended over aftermarket. |
| Nissan | Altima, Maxima, Murano, Pathfinder, 350Z, 370Z | VQ35DE/VQ37VHR engines — KS1 on Bank 1. Wiring harness rubs against heat shield. |
| Chevrolet / GMC | Silverado, Tahoe, Suburban, Camaro, Impala | 3.6L V6 — KS1 on left bank. Intake manifold removal required. GM knock sensors have high failure rate. |
| Ford | F-150, Explorer, Mustang, Edge, Flex | 3.5L EcoBoost — KS1 monitors front bank. Turbo heat damages wiring. PCM updates sometimes fix false codes. |
| Dodge / Chrysler | Charger, Challenger, 300, Grand Caravan | Pentastar 3.6L V6 — KS1 under intake manifold. Known for connector corrosion. |
| Subaru | Outback, Legacy, Forester, Impreza | Boxer engines — KS1 on side of block. Oil leaks onto sensor connector cause corrosion. |
| Lexus | RX350, ES350, GS350, IS350 | 2GR-FE V6 — KS1 under intake. Very expensive labor (up to 10 hours). All gaskets must be replaced. |
🛠️ How to Diagnose P0325 Code (Step-by-Step)
Systematic diagnosis saves hundreds of dollars and prevents unnecessary parts replacement. Follow this proven approach:
Step 1: Scan for All Codes with OBD2 Scanner
Use a quality OBD2 scanner (like OBDSTAR X300 DP, Autel MK808, Launch X431, or TOPDON ArtiDiag) to retrieve all stored and pending codes:
- P0326 — KS1 range/performance (Bank 1)
- P0327 — KS1 low input (Bank 1)
- P0328 — KS1 high input (Bank 1)
- P0330 — KS2 malfunction (Bank 2)
- P0332 — KS2 low input (Bank 2)
- P0606 — ECM internal fault (if present, suspect ECM)
📱 Recommended Scanner: OBDSTAR X300 DP Plus
Figure 4: OBDSTAR X300 DP Plus — Advanced diagnostic tablet with 8-inch display, full system diagnostics, and bi-directional control for reading P0325 and live data monitoring.
Step 2: Review Freeze Frame Data
Check freeze frame data to see when P0325 was set:
- Engine RPM — was the code set at idle, cruise, or under load?
- Coolant temperature — overheating when code set?
- Vehicle speed — highway or city driving?
- Throttle position — light or heavy acceleration?
Step 3: Visual Inspection of KS1 and Wiring
Locate KS1 on Bank 1 of the engine block (consult service manual for exact location). Inspect:
- Sensor body — cracks, corrosion, or physical damage
- Connector — corrosion (white/green powder), bent pins, moisture
- Wiring harness — frayed insulation, burn marks, rodent chews, rubbing against hot/sharp components
- Mounting bolt — loose, wrong torque, or dirty mounting surface
Step 4: Test KS1 Circuit with Multimeter
With the ignition ON (engine OFF), disconnect KS1 connector:
- Voltage test: Measure between signal wire and ground. Should read approximately 5V (ECM reference voltage).
- Resistance test: Measure across KS1 terminals. Should read approximately 560kΩ (internal pull-down resistor). Infinite resistance = open circuit (bad sensor or wiring).
- Continuity test: Check continuity from KS1 signal pin to ECM connector. Should be 0-1 ohm.
- Ground test: Check resistance from KS1 ground to chassis ground. Should be <5 ohms.
Step 5: Test KS1 with Live Data (Knock Simulation)
Using a scanner with live data capability:
- Start the engine and monitor KS1 voltage at idle — should read 0.5-1.0V
- Rev engine to 3,000 RPM — voltage should increase slightly
- Tap the engine block near KS1 with a wrench — voltage should spike to 2-5V
- If voltage does not spike, the sensor is not detecting vibrations (faulty sensor or poor mounting)
📊 Diagram 3: Knock Sensor Circuit Diagram
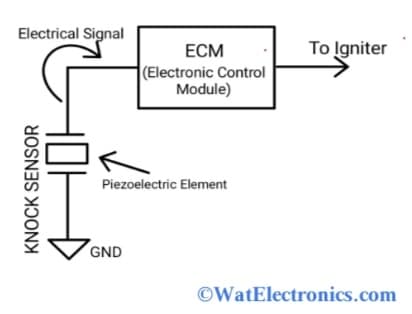
Figure 5: Knock sensor electrical circuit — the piezoelectric element generates an AC voltage signal that the ECM processes to detect detonation and adjust ignition timing.
Step 6: Check for Underlying Engine Issues
If the sensor and wiring test good, investigate mechanical causes:
- Listen for actual engine knock — metallic pinging under acceleration indicates real detonation
- Check coolant temperature — overheating causes knock; fix cooling system first
- Check fuel octane rating — low-octane fuel in high-compression engines causes knock
- Inspect spark plugs — wrong heat range or excessive gap causes pre-ignition
- Check for carbon buildup — hot spots on pistons or valves cause pre-ignition
Before replacing the knock sensor, confirm:
- ✅ No related ECM codes (P0606, communication faults)
- ✅ Wiring harness intact — no fraying, corrosion, or rodent damage
- ✅ Connector clean and pins straight
- ✅ 5V reference voltage present at sensor connector
- ✅ Sensor resistance ~560kΩ (not open or shorted)
- ✅ Sensor detects vibration when tapped (voltage spike)
- ✅ No underlying engine knock from mechanical issues
🔩 Step-by-Step Repair Guide for P0325
Based on your diagnosis, follow the appropriate repair path:
Option A: Wiring Repair (Easiest & Cheapest)
- Identify damaged section — trace wiring from KS1 to ECM
- Disconnect battery — negative terminal first
- Cut out damaged wire — use wire strippers to expose 1/2 inch of clean copper
- Install heat-shrink butt connectors — use 18-gauge automotive wire for signal paths
- Apply dielectric grease — to connector terminals to prevent future corrosion
- Secure wiring — away from hot components and sharp edges with zip ties
- Reconnect battery and clear codes — test drive for 20 minutes
Option B: Connector Repair or Replacement
- Disconnect KS1 connector — press locking tab
- Clean terminals — with electrical contact cleaner and small brush
- Straighten bent pins — carefully with needle-nose pliers
- If connector is damaged — replace with OEM pigtail connector (solder and heat-shrink)
- Apply dielectric grease — to all terminals before reconnecting
- Ensure locking clip engages — prevents vibration from loosening connection
Option C: Knock Sensor 1 Replacement
- Order correct sensor — match OEM part number (e.g., Denso 22060-0C010 for Toyota, AC Delco 12623798 for GM)
- Disconnect battery — negative terminal
- Access KS1 — on 4-cylinder: usually accessible from top. On V6/V8: may require intake manifold removal (3-8 hours labor)
- Disconnect connector — press locking tab
- Remove mounting bolt — use correct socket (typically 22mm, 27mm, or 12mm)
- Clean mounting surface — remove all rust, paint, and debris with sandpaper
- Install new sensor — apply small amount of thread sealant if specified
- Torque to spec — typically 15-23 Nm (11-17 ft-lbs). NEVER guess — over-torquing destroys the sensor!
- Reconnect wiring — ensure locking clip clicks
- Reinstall intake manifold (if removed) — use new gaskets, torque in sequence
- Reconnect battery and clear codes
- Test drive — 20 minutes varied driving to verify repair
📱 Scanner for Live Data:
Figure 6: Multi-brand vehicle selection menu with full diagnostic coverage for reading P0325 across all major manufacturers.
Option D: ECM Software Update (Rare)
- Check for TSBs — Technical Service Bulletins for your specific vehicle
- Visit dealer — some vehicles have overly sensitive knock detection software
- PCM reflash — updates calibration to reduce false P0325 codes
- Cost: $100-$250 at dealer
On V6 and V8 engines, if the intake manifold must be removed to access KS1, always replace both knock sensors (KS1 and KS2) simultaneously. The labor is 90% of the cost — adding the second sensor costs only $30-$80 extra in parts but saves you from paying full labor again when the other sensor fails in 6 months.
💰 P0325 Repair Cost by Country (2026 Updated)
Repair costs vary dramatically based on engine layout (sensor accessibility) and vehicle type:
| Vehicle Type | 🇺🇸 USA | 🇬🇧 UK | 🇦🇪 UAE | 🇮🇳 India |
|---|---|---|---|---|
| Compact 4-Cylinder (Civic, Corolla, Sentra) | $200 – $400 | £160 – £320 | AED 750 – AED 1,500 | ₹6,000 – ₹12,000 |
| Midsize V6 Sedan (Camry V6, Accord V6, Altima V6) | $400 – $800 | £320 – £640 | AED 1,500 – AED 3,000 | ₹12,000 – ₹24,000 |
| Full-Size Truck/SUV V8 (F-150, Silverado, Tahoe) | $500 – $900 | £400 – £720 | AED 1,850 – AED 3,350 | ₹15,000 – ₹28,000 |
| European Luxury (BMW, Audi, Mercedes) | $700 – $1,300 | £560 – £1,040 | AED 2,600 – AED 4,800 | ₹21,000 – ₹40,000 |
| Performance V8 (Mustang GT, Charger Hemi, Camaro SS) | $600 – $1,100 | £480 – £880 | AED 2,200 – AED 4,100 | ₹18,000 – ₹35,000 |
💡 Cost Breakdown (Typical V6 Midsize):
- Aftermarket knock sensor: $30 – $90
- OEM knock sensor: $80 – $280
- Intake manifold gasket set: $40 – $150
- Labor (4-6 hours): $350 – $650
- Coolant refill: $20 – $40
DIY 4-Cylinder: $50 – $150 | Professional V6/V8: $400 – $1,300
🚦 Can I Drive With P0325 Code?
Short answer: Short distances only — avoid heavy load and fix within 1-2 days.
| Scenario | Can You Drive? | Risk Level |
|---|---|---|
| Steady CEL, no knocking sound | Yes — light driving only | Medium |
| Active knocking/pinging under acceleration | NO — Stop immediately | Very High |
| Towing or hauling heavy load | NO — Avoid completely | Very High |
| Highway hills or mountain driving | NO — Avoid completely | High |
| Hot weather + heavy traffic | Limited — monitor coolant temp | High |
| Emissions test required | Cannot pass until fixed | Medium |
- ECM runs conservative timing map — 10-20% power loss
- 5-10% worse fuel economy (2-5 MPG drop)
- Undetected detonation can hole pistons in 30 minutes of high-load driving
- Head gasket failure from excessive cylinder pressure
- Ring and bearing damage from sustained knock
- Failed emissions test — cannot renew registration
🔴 How Serious Is P0325 Code?
P0325 is a high severity code. While the engine won't immediately stop running, the lack of knock protection on Bank 1 creates a serious risk of catastrophic engine damage.
Severity Scale: 8/10
- Immediate danger: Medium (engine runs but unprotected)
- Long-term engine risk: Very High (detonation destroys pistons, rings, bearings)
- Financial risk: High (sensor is cheap, but engine rebuild is $4,000-$10,000)
- Drivability impact: Medium-High (power loss, poor MPG, rough running)
Recommended Action: Diagnose and repair within 1-2 days. Do not tow, haul, or drive aggressively until fixed.
❌ Common Mistakes Mechanics Make With P0325
| Mistake | Why It's Wrong | Cost of Error |
|---|---|---|
| Replacing sensor without testing wiring first | Wiring faults cause ~30% of P0325 cases. Replacing a good sensor wastes $100+ and labor. | $100 – $800 |
| Not replacing both sensors on V6/V8 | When intake is off, the second sensor is $30-$80 extra. Paying full labor again in 6 months is wasteful. | $400 – $800 |
| Over-torquing the new sensor | Cracks the piezoelectric element immediately. Sensor fails within days. Always use torque wrench. | $50 – $300 |
| Ignoring dirty mounting surface | Rust, paint, or debris dampens vibration transfer. Sensor cannot detect knock properly. | $100 – $800 |
| Not replacing intake gaskets | Reusing old gaskets causes vacuum leaks, misfires, and new codes. Always use new gaskets. | $200 – $500 |
| Skipping knock simulation test | Without tapping the block to verify sensor response, you can't confirm the repair fixed the issue. | Time only |
| Not checking for underlying engine knock | If the engine actually has detonation from carbon buildup or low octane, new sensor won't help. | $100 – $500 |
Before spending money on parts, invest in a $30-$80 OBD2 scanner with live data (like OBDSTAR X300 DP or TOPDON ArtiDiag). Watching KS1 voltage in real-time while tapping the engine block will tell you within 5 minutes if the sensor is actually bad or if it's a wiring issue.
🛡️ Prevention Tips: How to Avoid P0325 in the Future
- Use correct octane fuel — follow manufacturer recommendation. Using regular in a premium-required engine causes detonation.
- Fix coolant leaks immediately — coolant dripping onto the knock sensor causes internal corrosion and failure.
- Change oil on schedule — old oil increases engine vibration and bearing wear, which can overwhelm the sensor.
- Use fuel system cleaner annually — prevents carbon buildup that creates hot spots and pre-ignition.
- Keep engine cooling system maintained — overheating is a major cause of detonation. Replace coolant, thermostat, and water pump on schedule.
- Inspect wiring during routine service — look for fraying, rubbing, or heat damage near the knock sensor harness.
- Torque sensors correctly — if you replace a sensor, always use a torque wrench. Over-tightening destroys the piezoelectric element.
- Address engine noise promptly — if you hear pinging or knocking, don't ignore it. Fix the root cause before the sensor fails.
- Keep connectors clean — apply dielectric grease to sensor connectors during maintenance to prevent moisture intrusion.
- Replace sensors preventively at 100,000 miles — on high-mileage V6/V8 engines, consider replacing both sensors during a major service.
❓ Frequently Asked Questions (FAQs) About P0325
🔗 Related DTC Articles
📝 Final Thoughts
The P0325 code is one of the most serious OBD-II codes you can encounter because it directly affects engine protection. While the knock sensor itself is a small, inexpensive part, its role in preventing catastrophic engine damage is enormous. A failed KS1 on Bank 1 leaves that entire cylinder bank unprotected from detonation — and undetected knock can destroy pistons, rings, and bearings in a surprisingly short time.
The good news is that P0325 is often caused by simple, inexpensive issues like corroded wiring or a loose connector. Always diagnose systematically — test the wiring, connector, and circuit before condemning the sensor. And if you do need to replace the sensor on a V6 or V8, replace both sensors while the intake is off. The small extra cost in parts will save you hundreds in labor down the road.
- Scan for all codes — check for related P0326, P0327, P0330, P0332, P0606
- Inspect KS1 wiring and connector for corrosion, damage, or looseness
- Test circuit voltage (5V reference), resistance (~560kΩ), and continuity
- Perform knock simulation test — tap block near sensor, verify voltage spike
- Replace wiring/connector first if faulty — cheaper than sensor replacement
- Replace sensor only if wiring tests good and sensor fails knock test
- On V6/V8: replace BOTH sensors when intake is off
- Torque new sensor to exact spec — never guess!
- Clear codes and test drive 20 minutes to verify
📌 Bookmark this page for future reference!
If you found this guide helpful, share it with fellow car owners and mechanics.
Last Updated: July 25, 2022 | AL Ansari Automobile


.jpg)


.jpg)


.jpg&description= P0325 Code: Knock Sensor 1 Circuit Malfunction (Bank 1) | Complete Guide)
0 Comments
please do not enter Any spam words link in the comment box..